Building for Feature Selection
Now we know what a component looks like we can start to build the pipeline adding in actions that gives the component purpose.

The first component we will build as part of the pipeline is the data selection component with the class name Transition. This component provides a set of actions that focuses on tidying raw data by removing data columns that are not useful to the final feature set. These may include null columns, single value columns, duplicate columns and noise etc. We can also ensure the data is properly canonicalized through enforcing data typing.
Project Hadron Canonicalizes data following the canonical model pattern so that every component speaks the same data language. In this case and with this package all components use Pandas DataFrame format. This is common format used by data scientists and statisticians to manipulate and visualise large data sets.
Setting Up
Before we do that, and as shown in the previous section, we now use the environment variables to define the location of the Domain Contract and datastore.
import os
os.environ['HADRON_PM_PATH'] = '0_hello_meta/demo/contracts'
os.environ['HADRON_DEFAULT_PATH'] = '0_hello_meta/demo/data'
For the feature selection we are using the Transition component with the ability to select the correct columns from raw data, potentially reducing the column count. In addition the Transitioning component extends the common reporting tools and provides additional functionality for identifying quality, quantity, veracity and availability.
It should be worth noting we are creating a new component and as such
must set up the input and the output of the component. The input here is a
direct URL to a resource on the Internet. We can also use this technique
to access other common storage such as AWS S3 where we prefix the bucket and
file name with s3 for example s3://<bucket>/<path>/<name.ext>.
Alternatively we could copy the file to the local environment variable path
And load the data directly using tr.set_source('phpMYEkMl.csv')
from ds_discovery import Transition
# get the instance
tr = Transition.from_env('hello_tr', has_contract=False)
tr.set_source_uri('https://www.openml.org/data/get_csv/16826755/phpMYEkMl.csv')
tr.set_persist()
Adding Select Actions
At the core of a component is its tasks, in other words how it changes incoming data into a different data outcome. To achieve this we use the actions that are set up specifically for this Component. These actions are the intentions of the specific component also know as the components intent. The components intent is a finite set of methods, unique to each component, that can be applied to the raw data in order to change it in a way that is useful to the outcome of the task.
In order to get a list of a component’s intent, in this case feature
selection, you can use the Python method __dir__(). In this case
with the transition component tr we would use the command
tr.tools.__dir__()to produce the directory of the components
select intent. Remember this method call can be used in any components
intent tools.
Now we have added where the raw data is situated we can load the
canonical, called, df…
df = tr.load_source_canonical()
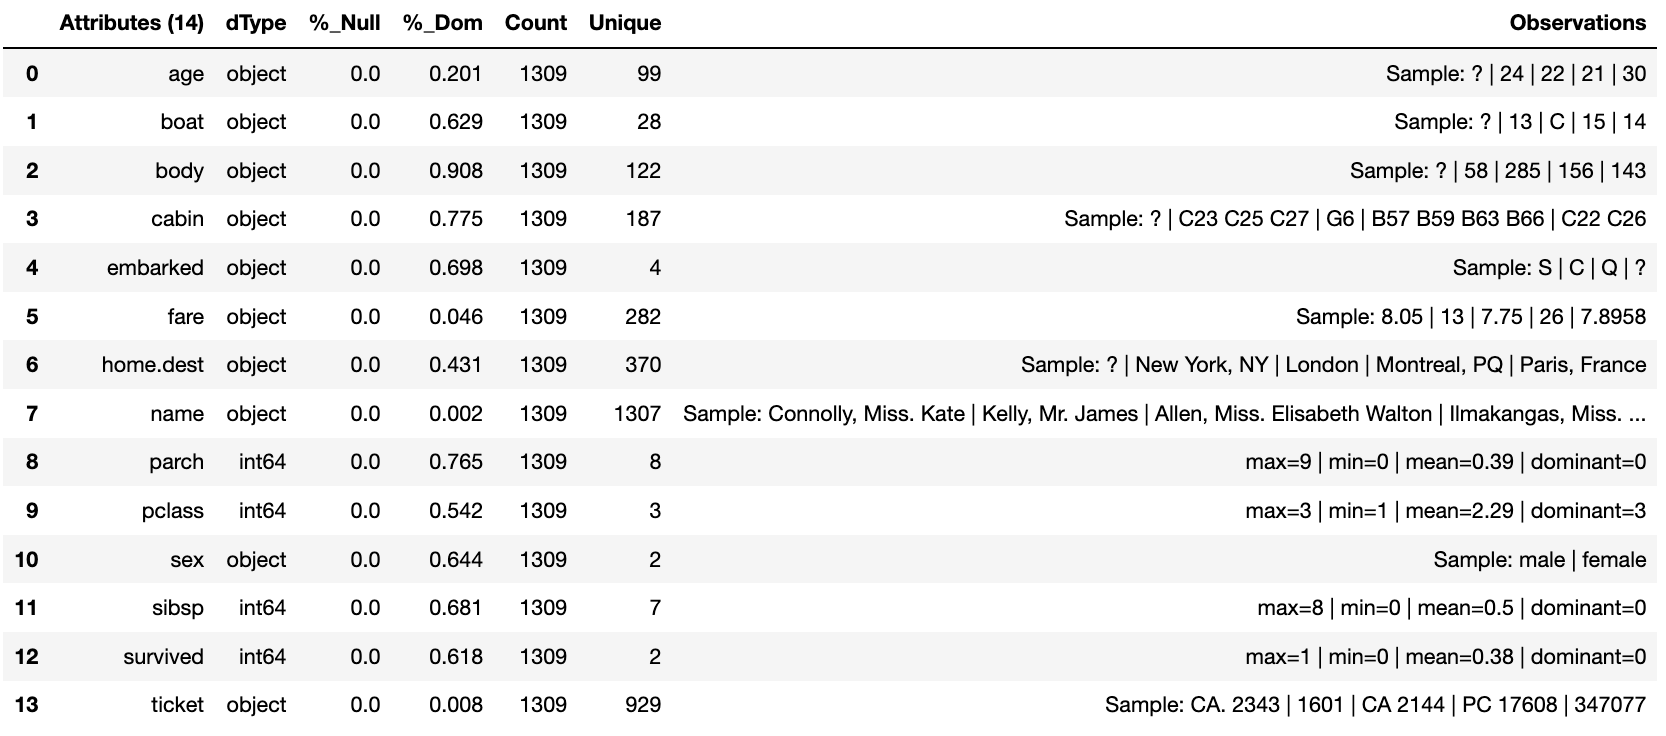
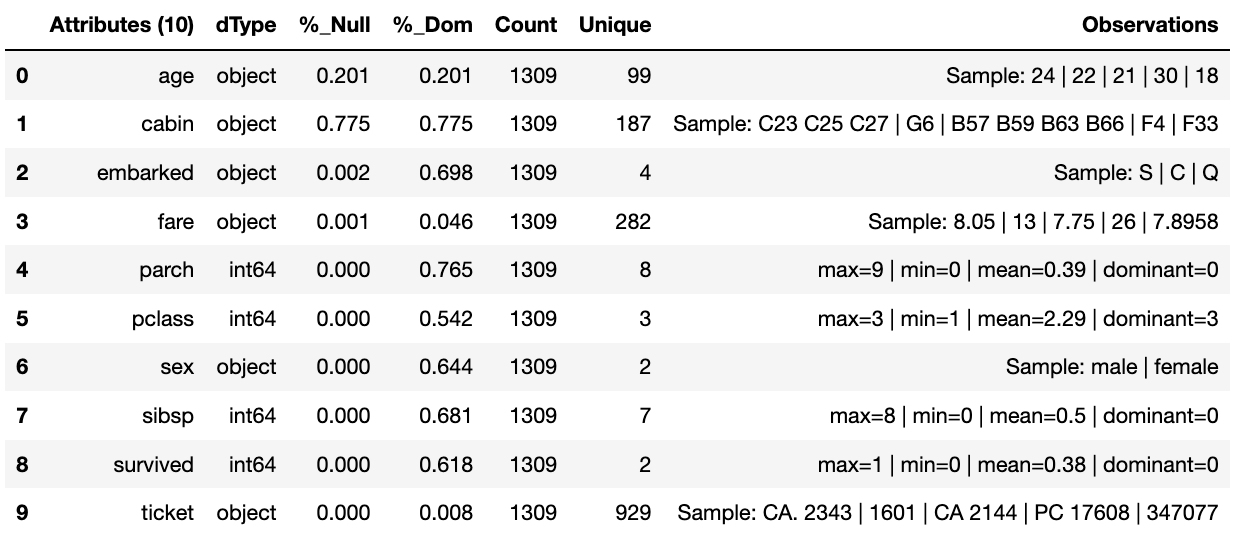
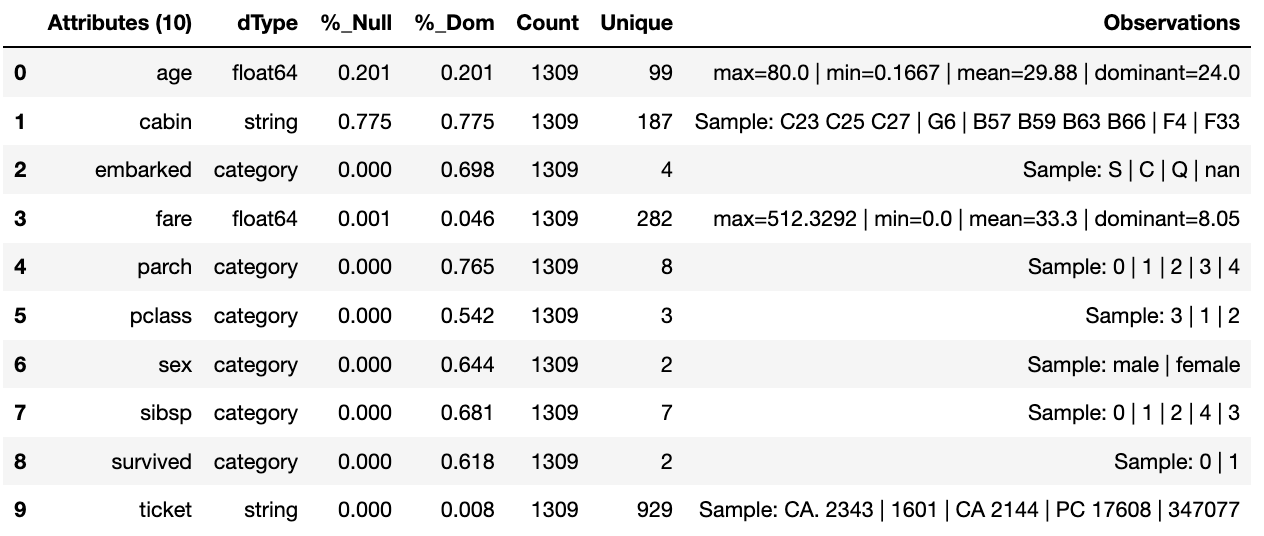
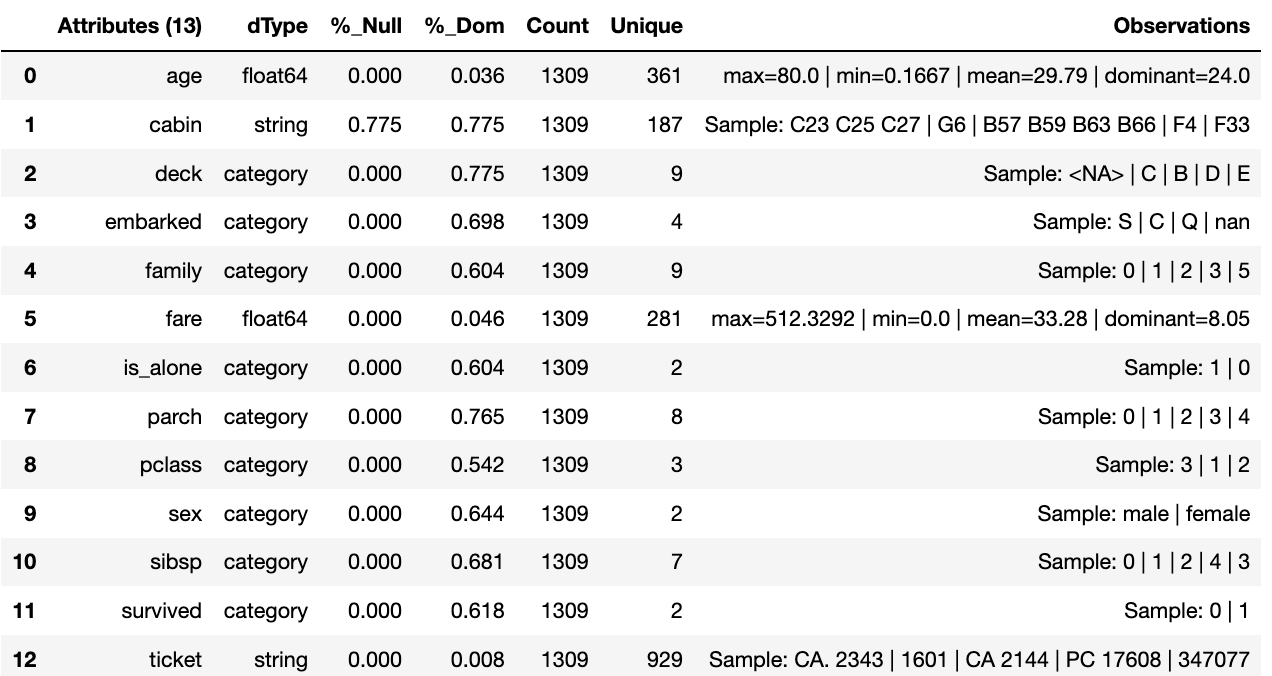
…and produce the report on the raw data so we can observe the features of interest.
tr.canonical_report(df)
Features of Interest
The components intent methods are not first class methods but part of
the intent_model_class. Therefore to access the intent specify the
controller instance name, in this case tr, and then reference the
intent_model_class to access the components intent. To make this
easier to remember with an abbreviated form we have overloaded the
intent_model name with the name tools. You can see with all
reference to the intent actions they start with tr.tools.
When looking for features of interest, through observation, it appears,
within some columns space has been repalaced by a question mark
?. In this instance we would use the auto_reinstate_nulls to
replace all the obfuscated cells with nulls. In addition we can
immediately observe columns that are inappropriate for the needs. In
this case we do not need the column name and it is removed using
to_remove passing the name of the attribute.
# returns obfuscated nulls
df = tr.tools.auto_reinstate_nulls(df, nulls_list=['?'])
# removes data columns of no interest
df = tr.tools.to_remove(df, headers=['name'])
Run Component
To run a component we use the common method run_component_pipeline
which loads the source data, executes the component task then persists
the results. This is the only method you can use to run the tasks of a
component and produce its results and should be a familiarized method.
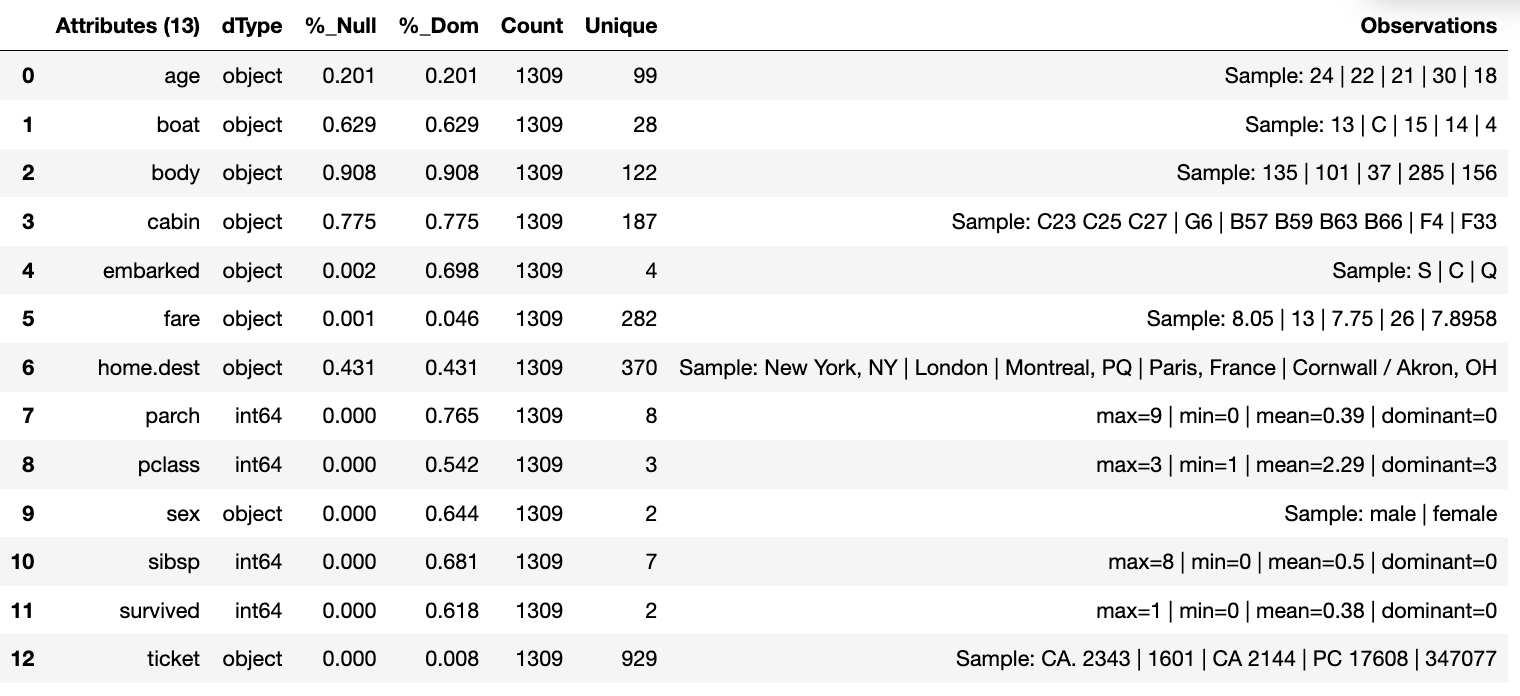
We can now run the run_component_pipeline and use the canonical
report to observe the outcome. From it we can see the nulls column now
indicates the number of nulls in each column correctly so we can deal
with them later. We have also removed the column name.
tr.run_component_pipeline()
tr.canonical_report(tr.load_persist_canonical())
As we continue the observations we see more columns that are of limited
interest and need to be removed as part of the selection process.
Because the components intent action is mutable we can re-implement the
to_remove including the new headers within the list. As this
overwrites the original component intent we must make sure to include
the name Column.
df = tr.tools.to_remove(df, headers=['name', 'boat', 'body', 'home.dest'])
As the target is a cluster algorithm we can use the auto_to_category
to ensure the data typing is appropriate to the column type.
df = tr.tools.auto_to_category(df, unique_max=20)
Finally we ensure the two contiguous columns are set to numeric type. It is worth noting though age is an integer, Python does not recognise nulls within an integer type and automatically chooses it as a float type.
df = tr.tools.to_numeric_type(df, headers=['age', 'fare'])
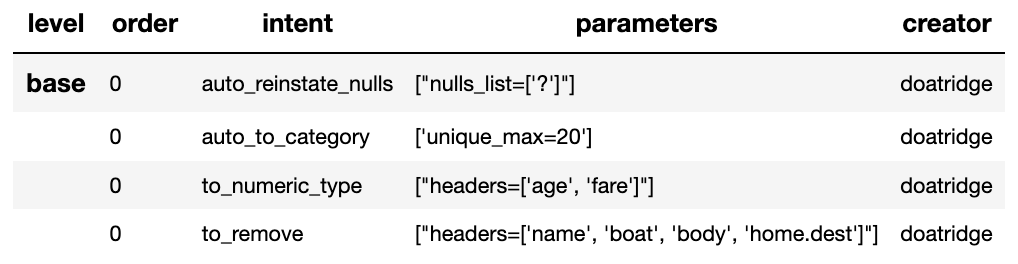
Using the Intent reporting tool to check the work and see what the Intent currently looks like all together.
tr.report_intent()
Adding these actions or the components intent is a process of looking at the raw data and the observer making decisions on the selection of the features of interest. Therefore component selection is potentially an iterative task where we would add component intent, observe the changes and then repeat until the process is complete.
Ordering the Actions of a Component
With the component intent now defined the run pipeline does its best to guess the best order of that Intent but sometimes we want to ensure things run in a certain order due to dependencies or other challenges. Though not necessary, we will clear the previous Intent and write it again, this time in order.
tr.remove_intent()
This time when we add the Intent we include the parameter
intent_level to indicate the different order or level of execution.
We load the source canonical and repeat the Intent, this time including the new intent level.
df = tr.load_source_canonical()
df = tr.tools.auto_reinstate_nulls(df, nulls_list=['?'], intent_level='reinstate')
df = tr.tools.to_remove(df, headers=['name', 'boat', 'body', 'home.dest'], intent_level='remove')
df = tr.tools.auto_to_category(df, unique_max=20, intent_level='auto_category')
df = tr.tools.to_numeric_type(df, headers=['age', 'fare'], intent_level='to_dtype')
df = tr.tools.to_str_type(df, headers=['cabin', 'ticket'],use_string_type=True , intent_level='to_dtype')
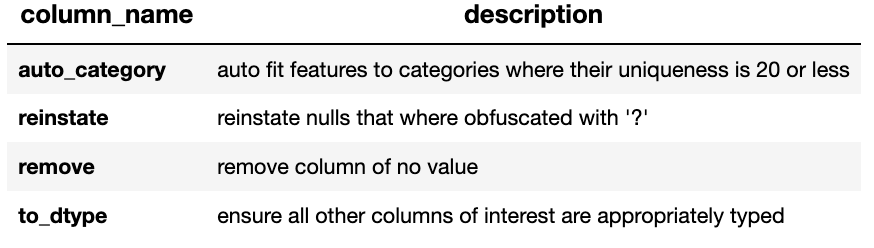
In addition, and as an introduction to a new feature, we will add in the column description that describes the reasoning behind why an Intent was added.
tr.add_column_description('reinstate', description="reinstate nulls that where obfuscated with '?'")
tr.add_column_description('remove', description="remove column of no value")
tr.add_column_description('auto_category', description="auto fit features to categories where their uniqueness is 20 or less")
tr.add_column_description('to_dtype', description="ensure all other columns of interest are appropriately typed")
Using the report we can see the addition of the numbers, in the level column, which helps the run component run the tasks in the order given. It is worth noting that the tasks can be given the same level if the order is not important and the run component will deal with it using its ordering algorithm.
tr.report_intent()
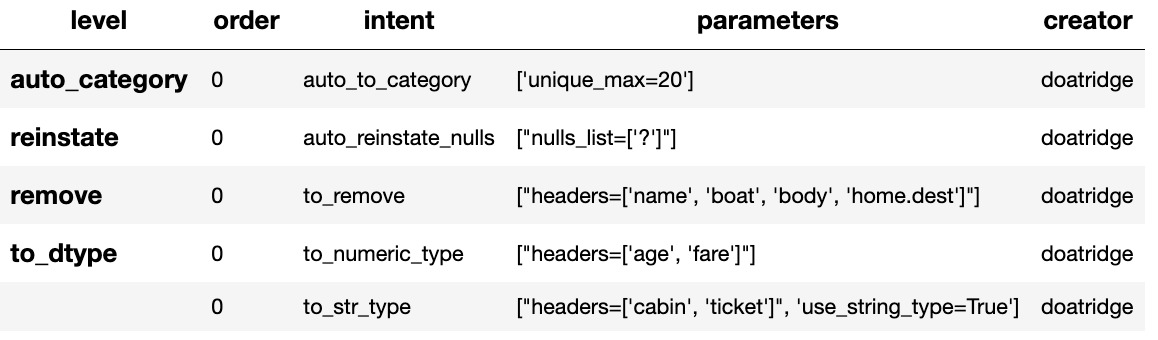
As we have taken the time to capture the reasoning to include the component Intent we can use the reports to produce a view of the Intent column comments that are invaluable when interrogating a component and understanding why decisions were made.
tr.report_column_catalog()
Run Ordered Actions
As usual we can now run the Component to apply the components tasks.
tr.run_component_pipeline()
As an extension of the default, run_component_pipeline provides
useful tools to help manage the outcome. In this case we’ve
specifically defined the Intent order we wanted to run.
tr.run_component_pipeline(intent_levels=['remove', 'reinstate', 'auto_category', 'to_dtype'])
Include a Run Book
A challenge faced with the component intent is its order, as you have
seen. The solution thus far only applies at run time and is therefore
not repeatable. We introduced the idea of Run Books as a repeatable set
of instructions which contain the order in which to run the components
intent. Run Books also provide the ability to partially implement
component intent actions, meaning we can replay subsets of a fuller list
of a components intent. For example through experimentation we have
created a number of additional component intents, that are not pertinent
to a production ready selection. By setting up two Run Books we can
select which component intent is appropriate to their objectives and
run_component_pipeline to produce the appropriate outcome.
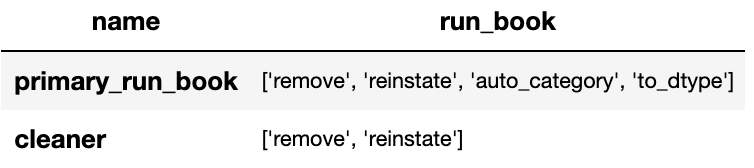
In the example we add the list of intent to a book in the order needed. In this case we have not specified a book name so this book is allocated to the primary Run Book. Now each time we run pipeline, it is set to run the primary Run Book.
tr.add_run_book(run_levels=['remove', 'reinstate', 'auto_category', 'to_dtype'])
Here we had a book by name where we select only the intent that cleans the raw data. The Run book report Now what are shows us the two run books;
tr.add_run_book(book_name='cleaner', run_levels=['remove', 'reinstate'])
tr.report_run_book()
In this next example we add an additional Run Book that is a subset of the tasks to only clean the data. By passing this named Run Book to the run pipeline it is obliged to only run this subset and only clean the data. We can see the results of this in the canonical report below.
tr.run_component_pipeline(run_book='cleaner')
tr.canonical_report(tr.load_persist_canonical())
As a contrast to the above we can run the pipeline without providing a Run Book name and it will automatically default to the primary run book, assuming this has been set up. In this case running the full component Intent the resulting outcome is shown below in the canonical report.
tr.run_component_pipeline()
tr.canonical_report(tr.load_persist_canonical())
Building for Feature Engineering
Machine learning models are only as good as the data that is used to train them. A key characteristic of good training data is that it is provided in a way that is optimized for learning and generalization. The process of putting together the data in this optimal format is known in the industry as feature transformation using feature engineering.
After selection, based on your application background knowledge and data analysis, you might decide which data fields (or features) are important to include in the input data. Once you have decided on which fields to include, you transform these features to help the learning process. Transformations add background experience to the input data, enabling the machine learning model to benefit from this experience.
This new component works in exactly the same way as the selection component, whereby we create the instance pertinent to the intentions, give it a location to retrieve data from, the source, and where to persist the results. Then we add the component intent, which in this case is to engineer the features we have selected and make them appropriate for a machine learning model or for further investigation.
Setting Up
import os
os.environ['HADRON_PM_PATH'] = '0_hello_meta/demo/contracts'
os.environ['HADRON_DEFAULT_PATH'] = '0_hello_meta/demo/data'
For feature engineering the component we will use, that contains the
feature engineering intent, is called wrangle.
from ds_discovery import Wrangle, Transition
# get the instance
wr = Wrangle.from_env('hello_wr', has_contract=False)
With the source we want to be able to retrieve the outcome of the
previous select component as this contains the selected features of
interest. In order to retrieve this information we need to access the
select components Domain Contract, remember this holds all the knowledge
for any component. As this is a common thing to do there is a First
class method call get_persist_contract that can be called directly.
To retrieve the name of the source we are interested in we reload the
previous component Transition giving it the unique name we used when
creating the select component, in this case hello_wr, this loads the
select components Domain Contract and then get_persist_contract
which returns the string value of the outcome of that select component.
source = Transition.from_env('hello_tr').get_persist_contract()
wr.set_source_contract(source)
wr.set_persist()
As a check we can run the canonical report and see that we have loaded the output of the previous component (Transition component) into the current source.
df = wr.load_source_canonical()
wr.canonical_report(df)

Engineering the Features
As mentioned in the previous component demo, the components intent methods are not first class methods but part of the intent_model_class. Therefore to access the intent specify the controller instance name, in this case tr, and then reference the intent_model_class to access the components intent. To make this easier to remember with an abbreviated form we have overloaded the intent_model name with the name tools. You can see with all reference to the intent actions they start with tr.tools.
Now we have the source we can deal with the feature Engineering. As this is for the purpose of demonstration we are only sampling a small selection of Intent methods. It is well worth looking through the other Intent methods to get to know the full extent of the feature engineering package.
To get started, the column name sibsip, the number of siblings or
the spouse of a person onboard, and parch, the number of parents or
children each passenger was touring with, added together provide a new
value that provides the size of each family.
df['family'] = wr.tools.correlate_aggregate(df, headers=['parch', 'sibsp'], agg='sum', column_name='family')
The column name cabin provides us with a record of the cabin each
passenger was allocated. Taking the first letter from each cabin gives
us the deck the passenger was on. This provides us with a useful
categorical.
df['deck'] = wr.tools.correlate_custom(df, code_str="@['cabin'].str[0]", column_name='deck')
We also note that a passenger travelling alone seems to have an improved
survival rate. By selecting family, who’s value is one and giving
all other values a zero we can create a new column is_alone that
indicates passengers travelling on their own.
selection = [wr.tools.select2dict(column='family', condition='@==0')]
df['is_alone'] = wr.tools.correlate_selection(df, selection=selection, action=1, default_action=0, column_name='is_alone')
Finally we ensure each of the new features are appropriately typed
as a category. We also want to ensure the change to catagory runs after
the newly created columns so we add the parameter intent_order with
a value of one.
df = wr.tools.model_to_category(df, headers=['family','deck','is_alone'], intent_order=1, column_name='to_category')
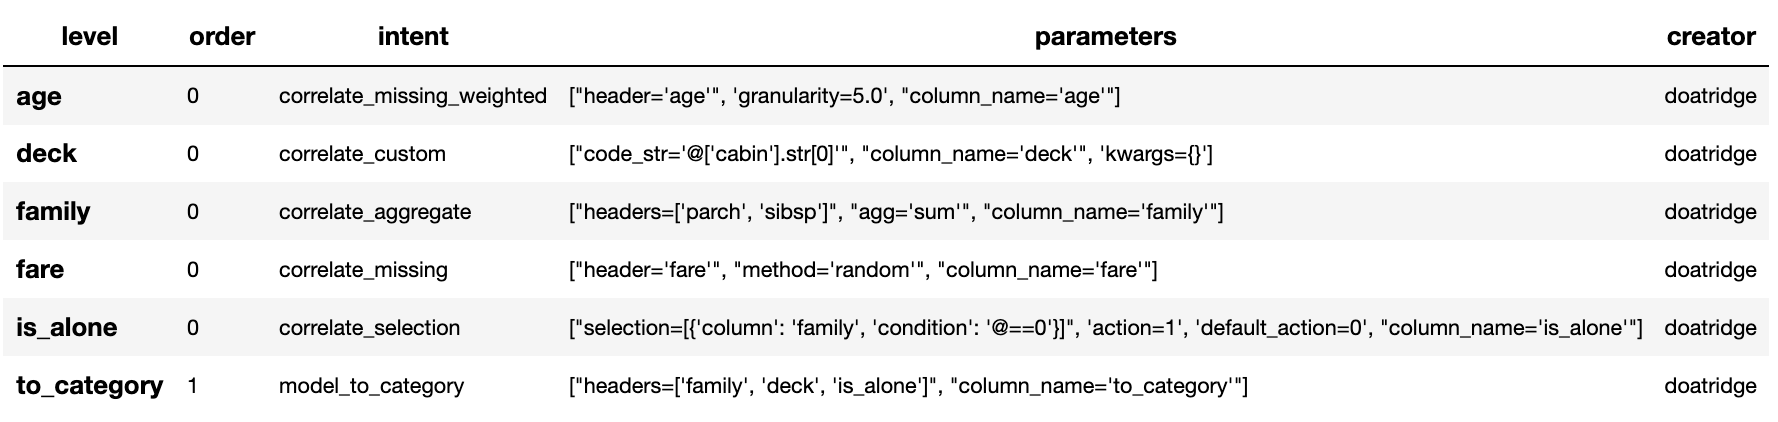
By running the Intent report we can observe the change of order of the intent level.
wr.report_intent()

Run Component
To run a component we use the common method run_component_pipeline
which loads the source data, executes the component task , in this case
components intent, then persists the results. This is the only method
you can use to run the tasks of a component and produce its results and
should be a familiarized method.
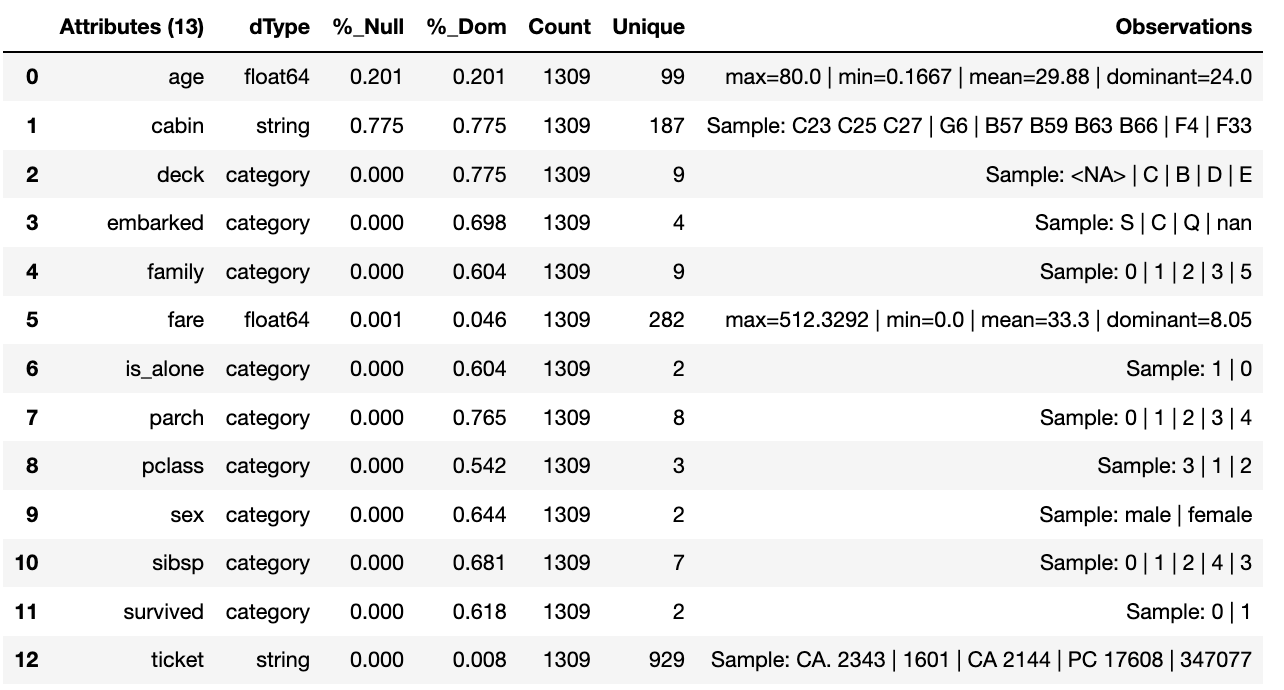
At this point we can run the pipeline and see the results of the new features.
wr.run_component_pipeline()
wr.canonical_report(df)
Imputation
Imputation is the act of replacing missing data with statistical estimates of the missing values. The goal of any imputation technique is to produce a complete dataset that can be used to train machine learning models. There are three types of missing data: - Missing Completely at Random (MCAR); where the missing data has nothing to do with another feature(s) - Missing at Random (MAR); where missing data can be interpreted from another feature(s) - Missing not at Random (MNAR); where missing data is not random and can be interpreted from another feature(s)
With deck and fair we can assume MCAR but with age it
appears to have association with other features. But for the purposes of
the demo we are going to assume it to also be MCAR.
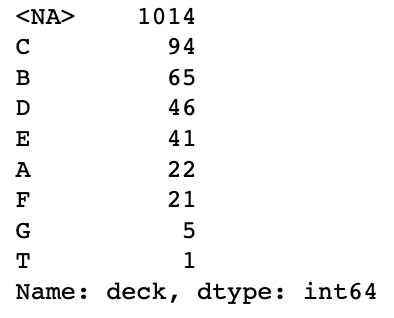
With deck the conversion to categorical has already imputed the
nulls with the new categorical value therefore we do not need to do
anything.
df['deck'].value_counts()
With fare we chose a random number whereby this number is more
likely to fall within a populated area and preserves the distribution of
the data. This works particulary well with the small amount of missing
data.
df['fare'] = wr.tools.correlate_missing(df, header='fare', method='random', column_name='fare')
Age is slightly more tricky as its null values are quite large. In this instance we will use probability frequency, which like random values preserves the distribution of the data. Quite often, in these cases, we can add an additional boolean column that tells us which values were generated to replace nulls.
df['age'] = wr.tools.correlate_missing_weighted(df, header='age', granularity=5.0, column_name='age')
Using the Intent report we can check on the additional intent added.
wr.report_intent()
Include a Run Book
We have touched on Run Book before where by the Run Book allows us to
define a run order that is preserved longer term. With the need for
to_category to run as the final intent the Run Book fulfills this
perfectly.
Adding a Run Book is a simple task of listing the intent in the order in which you wish it to run. As discussed before we are using the default Run Book which will automatically be picked up by the run component as its run order.
wr.add_run_book(run_levels=['age','deck','family','fare','is_alone','to_category'])
wr.run_component_pipeline()
Finally we can finish off by checking the Run Book with the Run Book report and produce the Canonical Report to see the changes the feature engineering has made.
wr.report_run_book()

wr.canonical_report(wr.load_persist_canonical(), stylise=False)
Building a Controller
The Controller is a unique capability that independently orchestrates the components registered to it. It allows several component Domain Contracts to be run in a given order as a richer distributable microservice task. This allows for capability actions to be captured within a known ensemble of components providing the separation of concerns, separation of product, management over process management and the reduction of complexities in system microservice orchestration and, with it, cost.
When components are completed the controller orchestrates those components producing its own Domain Contract which is passed on with the component Domain Contracts to produce a Domain Contract Ensemble. This can then be run as a microservice.
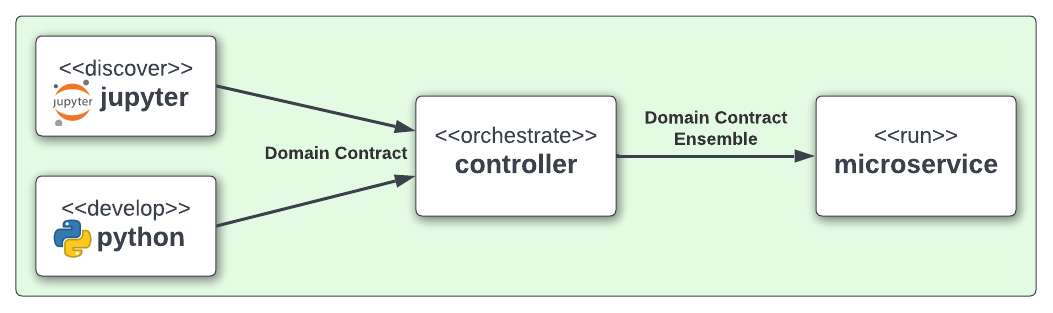
The Controller executes the component’s Domain Contract intention, or run metadata, and not its code, giving it separation from its conception. Domain Contracts belonging to a Controller should be in the same path location as the Controllers Domain Contract.
The Controller executes the registered Controllers Domain Contracts in
accordance to the instructions given to it when the run_components
is executed. The Controller orchestrates how those components should run
with the components being independent in their actions and therefore a
separation of concern.

With Controller you do not need to give it a name as this is assumed in each folder containing Domain Contracts for this set of components, known as a Domain Contract Cluster. This allows us the entry point to integrate the Controller and its components.
Setting Up
import os
os.environ['HADRON_PM_PATH'] = '0_hello_meta/demo/contracts'
os.environ['HADRON_DEFAULT_PATH'] = '0_hello_meta/demo/data'
from ds_discovery import Controller
controller = Controller.from_env(has_contract=False)
Add Components
Now we have the empty Controller we need to register or add which components make up this Controller, it should be noted that the Domain Contracts for each component must be in the same folder of the Controller Domain Contract.
To add a component we use the intent method specific for that component
type in this case model_transition for hello_tr and
model_wrangle for hello_wr.
controller.intent_model.transition(canonical=0, task_name='hello_tr', intent_level='hw_transition')
controller.intent_model.wrangle(canonical=0, task_name='hello_wr', intent_level='hw_wrangle')
Report
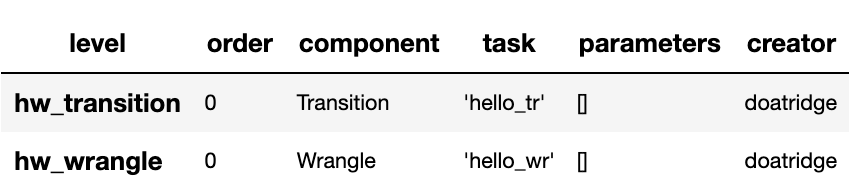
Using the Task report we can check the components have been added.
controller.report_tasks()
As with all components the Controller executes the components in the order given. By using the Controller’s special Run Book we are given considerably more flexibility in the order and behaviour of each component and how it interacts with others.
As good practice a Run Book should always be created for each Controller as this provides better transparency into how the components run.
run_book = [
    controller.runbook2dict(task='hw_transition'),
    controller.runbook2dict(task='hw_wrangle'),
]
controller.add_run_book(run_levels=run_book)
Run Controller Pipeline
To run the controller we execute run_controller this is a special
method and replaces run_component_pipeline, common to other
components, adding extra features to enable the control of the
registered components. This is the only method you can use to run the
Controller and execute its registered components. It is worth noting it
is the components that produce the outcome of their collective
objectives or tasks and not the Controller. The Controller orchestrates
how those components should run with the components being independent in
their actions and therefore a separation of concerns.
controller.run_controller()
The Controller is a powerful tool and should be investigated further to
understand all its options. The Run Book can be used to provide a set of
instructions on how each component receives its source and persists, be
it to another component or as an external data set. The
run_controller has useful tools to monitor changes in incoming data
and provide a run report of how all the components ran.
In the section below we will demonstrate a couple of these features.
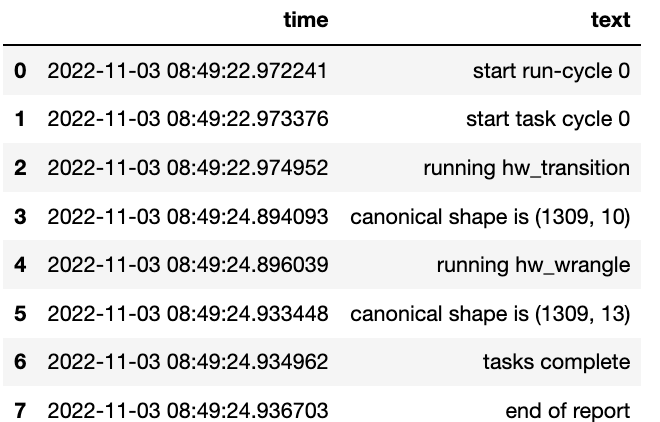
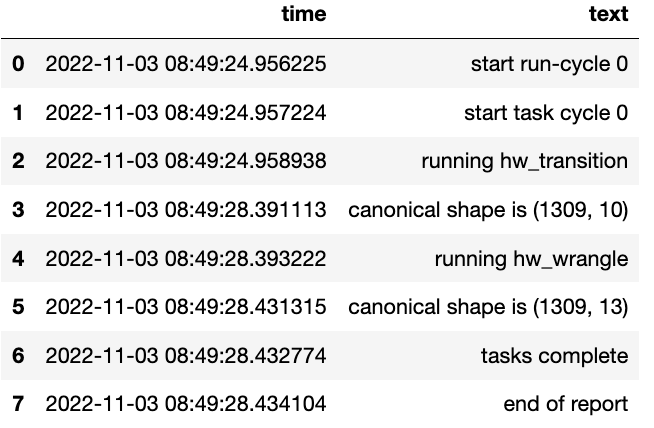
One of the most useful parameters that comes with the run_controller
is the run_cycle_report that saves off a run report, that provides
the run time of the controller and the components there in.
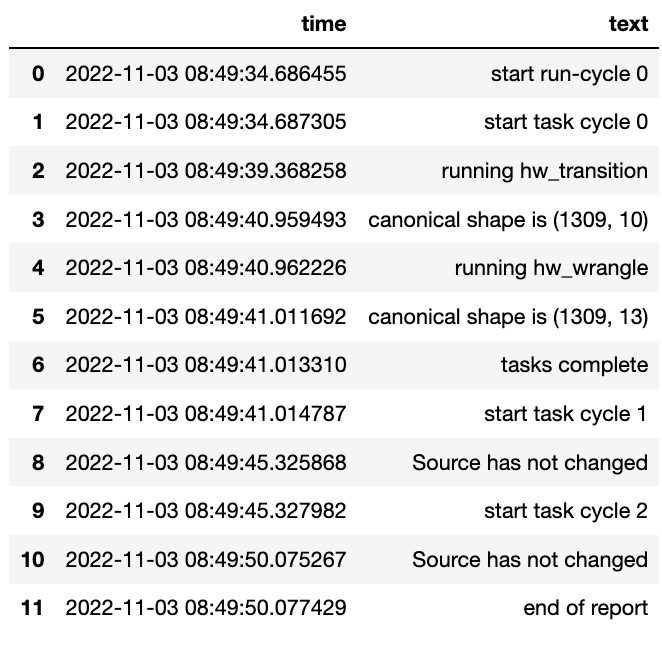
controller.run_controller(run_cycle_report='cycle_report.csv')
controller.load_canonical(connector_name='run_cycle_report')
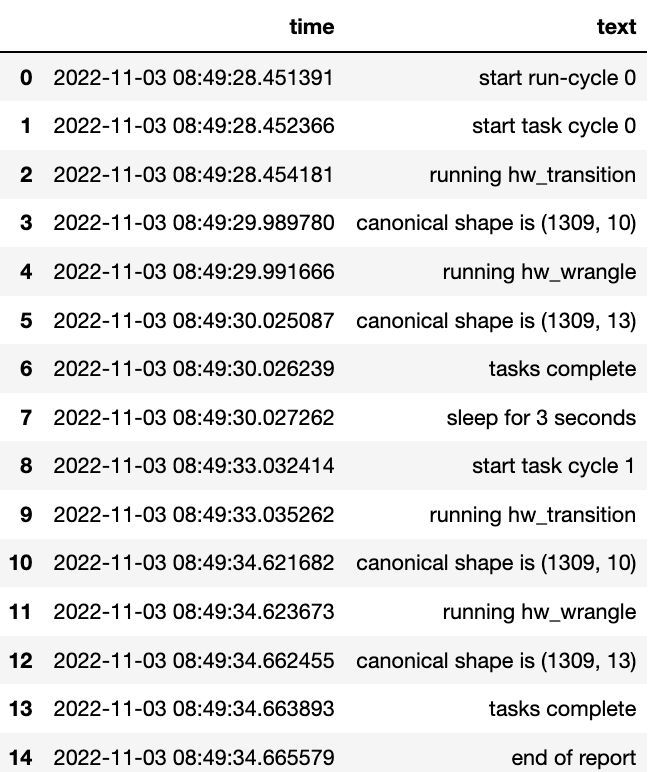
Now we have the run_cycle_report we can observe the other
parameters. In this case we are adding the run_time parameter that
runs the controllers components for a time period of three seconds
controller.run_controller(run_time=3, run_cycle_report='cycle_report.csv')
controller.load_canonical(connector_name='run_cycle_report')
In this example we had the parameters repeat and sleep where the
first defines the number of times to repeat the component cycleand the
second, and the number of seconds to pause between each cycle.
controller.run_controller(repeat=2, sleep=3, run_cycle_report='cycle_report.csv')
controller.load_canonical(connector_name='run_cyclHelloe_report')
Finally we use the source_check_uri parameter as a pointer to and
input source to watch for changes.
controller.run_controller(repeat=3, source_check_uri='https://www.openml.org/data/get_csv/16826755/phpMYEkMl.csv', run_cycle_report='cycle_report.csv')
controller.load_canonical(connector_name='run_cycle_report')